The primary barrier to canyoning for many is a fear of water, but technical skill and an understanding of physics are far more critical for safety than swimming ability.
- Specialized gear, like a 5-7mm canyoning wetsuit, provides significant buoyancy, acting as a built-in flotation aid.
- Escaping water hazards like hydraulic “keepers” relies on counter-intuitive, non-swimming procedures, not strength.
Recommendation: Focus on mastering pool-based water competency drills and learning procedural safety from a certified guide before your first trip.
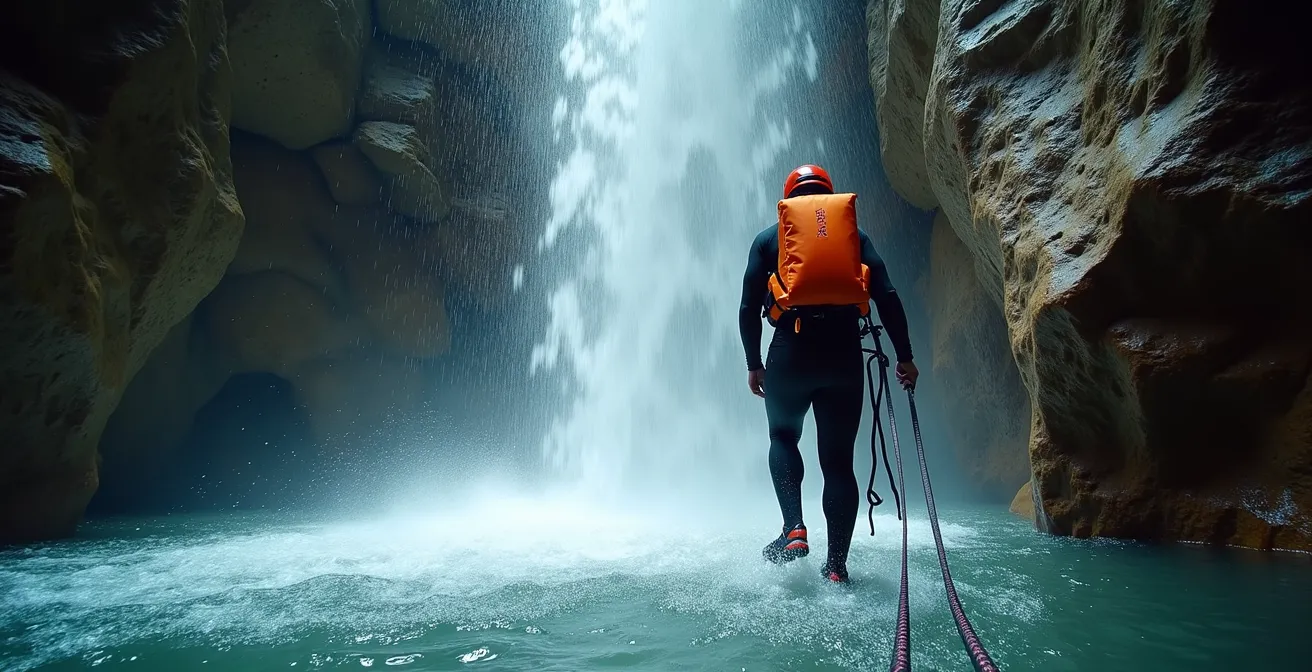
The image of descending a roaring waterfall into a deep, churning pool is both the allure and the primary fear of canyoning. For those who don’t identify as strong swimmers, this fear can feel like an insurmountable barrier. The common advice—”just wear a PFD” or “go with a guide”—is true, but it often fails to address the deep-seated anxiety about what happens when you’re in the water and can’t touch the bottom. This anxiety stems from a feeling of being out of control in an unpredictable element.
But what if safety in a canyon had less to do with swimming prowess and more to do with understanding physics and mastering specific, repeatable procedures? The secret to canyoning with confidence isn’t about becoming an Olympic swimmer; it’s about shifting your mindset from one of fear to one of technical competence. It’s about learning that your gear is a system designed to keep you safe and that water, while powerful, follows predictable rules.
This guide deconstructs that fear. We will move beyond the generic advice and delve into the technical specifics that empower non-swimmers. We will explore how to escape a hydraulic without fighting it, why your wetsuit is a critical piece of flotation gear, the proper technique for rappelling in water, and how to communicate effectively when you can’t be heard. By focusing on these procedures, you transform from a passive passenger into an active, knowledgeable participant in your own safety.
This article provides a structured approach to building water confidence through technical knowledge. Below is a summary of the key areas we will cover, designed to equip you with the skills and understanding needed to tackle your first canyoning adventure safely.
Summary: A Technical Guide to Canyoning Safety for Non-Swimmers
- The Washing Machine Effect: How to Escape a Hydraulic Keeper ?
- 5mm vs 7mm: Why Canyoning Wetsuits Are Different from Surfing Suits ?
- Rappelling Wet Ropes: Why Your Dry Technique Won’t Work in a Waterfall ?
- The Moss Damage: Why You Shouldn’t Step on Slick Rocks ?
- Optimizing Whistle Signals: How to Communicate Over the Roar of a Waterfall ?
- The ” Hazardous Activity” Exclusion: Why Your Policy Won’t Pay for Heli-Skiing
- Water Filters vs Tablets: How to Drink Safely from Streams ?
- How to Train for Alpine Peaks While Living at Sea Level ?
The Washing Machine Effect: How to Escape a Hydraulic Keeper ?
A hydraulic “keeper” or “hole” is one of the most feared water features in a canyon, often described as a “washing machine” that can trap a person. It forms where water flows over a submerged obstacle, creating a recirculating current that pulls objects on the surface back towards the obstacle. The natural instinct for anyone, especially a non-swimmer, is to fight this surface current and swim desperately downstream. This is not only exhausting but fundamentally incorrect and dangerous.
The key to escape is counter-intuitive: you must go down to get out. The recirculating current is primarily a surface phenomenon. Deeper down, an “outflow” current continues to move downstream. The correct procedure, according to rafting safety experts, is to stop fighting the surface, take a breath, and allow yourself to sink. By curling into a protective ball (a “tuck float”), you protect your head and airway while allowing this deeper current to grab you and flush you out past the dangerous “boil line” where the surface water erupts.
This technique requires no swimming ability—only discipline and trust in physics. Your PFD (Personal Flotation Device) and buoyant wetsuit will bring you back to the surface once you are clear of the recirculation. The protocol is a learned skill, not a test of strength. It involves conserving energy, protecting your airway, and letting the water’s own dynamics do the work for you. Practicing this mindset is a crucial first step to overcoming the fear of moving water.
5mm vs 7mm: Why Canyoning Wetsuits Are Different from Surfing Suits ?
A common misconception is that all wetsuits are created equal. However, a canyoning wetsuit is a highly specialized piece of safety equipment, fundamentally different from a typical surfing or diving suit. The most obvious difference is thickness. While a surf suit might be 2-4mm thick for flexibility, a canyoning suit is typically 5mm to 7mm thick. This isn’t just for warmth in cold canyon water; it’s a critical component of your buoyancy system.
This added thickness provides significant positive buoyancy. For instance, research shows that a standard 5mm wetsuit adds 4-6 pounds of buoyancy while a 7mm provides 7-8 pounds, complementing your PFD and making it much easier to stay afloat. This built-in flotation is a massive confidence booster for non-swimmers. Furthermore, canyoning suits are built for durability, featuring heavy reinforcement on the knees, elbows, and seat—areas that constantly make contact with abrasive rock. A surf suit would be shredded after a single canyon trip.

The table below highlights the key differences, showing that a canyoning wetsuit is not an optional upgrade but a purpose-built tool for abrasion resistance and flotation, designed as an integral part of your personal safety system in a harsh environment.
| Feature | Canyoning Wetsuit | Surfing Wetsuit |
|---|---|---|
| Thickness | 5-7mm standard | 2-4mm typical |
| Reinforcement | Knees, elbows, seat heavily reinforced | Minimal reinforcement |
| Buoyancy Aid | Acts as flotation component | Minimal buoyancy effect |
| Abrasion Resistance | High – built for rock contact | Low – designed for water only |
Rappelling Wet Ropes: Why Your Dry Technique Won’t Work in a Waterfall ?
Rappelling on a dry rock face is a skill of its own, but rappelling down a rope that is running through a waterfall introduces entirely new forces and challenges. A wet rope is heavier, creates more friction in some devices but can feel slicker, and the force of the water pushing against you can easily throw you off balance. For a non-swimmer, the sensory overload of water pounding on your helmet can be disorienting. A dry-land technique simply won’t suffice; you need a specific waterfall rappelling posture.
The primary goal is stability and airway protection. Instead of facing the wall directly, you must turn your head to the side to create an air pocket, allowing you to breathe without inhaling water. Your feet should be braced wide against the rock face, creating a stable triangular base. Crucially, you must keep your hips pushed away from the wall. This allows the bulk of the water to flow between you and the rock, rather than directly onto your body, which reduces the force pushing you around.
Canyoning-specific descenders (like a Petzl Pirana or an Edelrid Hannibal) are also designed to allow you to add friction mid-rappel, giving you more control over your descent speed as conditions change. Before you even begin, you must identify your exit zone—the safe area at the bottom where you can get out of the main water flow. This combination of body position, specialized gear, and pre-planning is what ensures a controlled and safe descent through the waterfall’s flow.
The Moss Damage: Why You Shouldn’t Step on Slick Rocks ?
In a canyon, not all rock surfaces are safe. One of the most common and avoidable dangers is slipping on slick, moss-covered rocks. As an expert source notes, “Canyoneering is a dangerous sport. It doesn’t matter how experienced or prepared you are; there’s always the potential of something going awry.” A simple slip can lead to a fall, injury, or an unexpected plunge into the water, creating a serious situation for a non-swimmer.
The key to safe footwork is learning to “read” the rock. Generally, light-colored, textured rock surfaces offer good grip. In contrast, dark, smooth, or shiny black surfaces are often covered in a thin, almost invisible layer of algae or “black moss” that is incredibly slippery, especially when wet. This is not the place to be testing your balance. The rule is simple: avoid the dark, shiny stuff at all costs.
Beyond visual identification, safe movement relies on a strict protocol. Always maintain three points of contact with the rock (two feet and one hand, or two hands and one foot) when traversing tricky sections. This provides a stable base should one point slip. Before committing your full weight to a step, gently test the surface to confirm its grip. This deliberate, methodical approach is far more important than speed and is a hallmark of an experienced canyoneer.
Action Plan: Safe Footwork Audit
- Visual Check: Before moving, identify a path that maximizes contact with light-colored, textured rock and avoids dark, smooth surfaces.
- Three-Point Contact: Actively inventory your points of contact. Before moving a foot or hand, ensure the other three are securely placed.
- Communicate Intent: Verbally or by pointing, show your guide or teammates your intended next foot or hand placement for feedback or assistance.
- Test Before Trusting: Gently apply pressure to a new foothold or handhold to check for stability and grip before committing your full body weight.
- Signal Confidence: Use deliberate, controlled movements. Rushed or hesitant steps signal instability to the rest of the team.
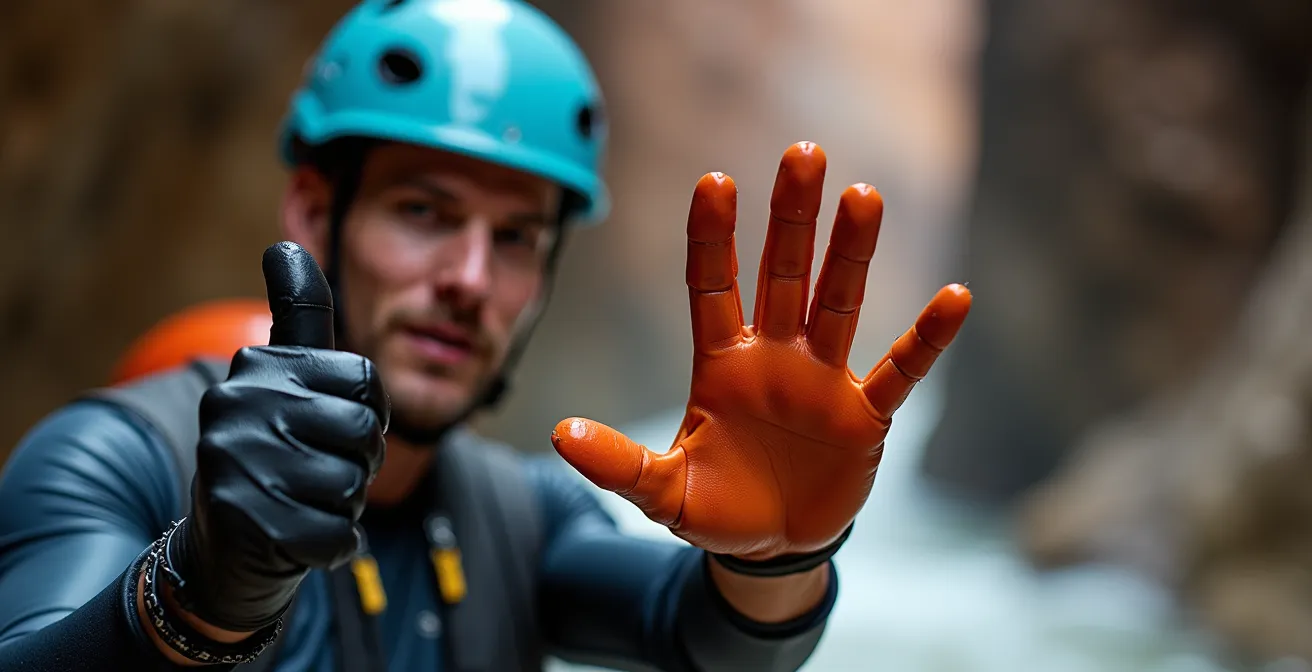
Optimizing Whistle Signals: How to Communicate Over the Roar of a Waterfall ?
The roar of a large waterfall can easily exceed 100 decibels, making verbal communication completely impossible. In this environment, a simple whistle is not just an accessory; it is a lifeline. However, a whistle is useless without a standardized, universally understood set of signals. Waving your arms or shouting is ambiguous and can be misinterpreted, whereas whistle blasts are clear, binary, and cut through the ambient noise.
Every member of a canyoning team must know the essential signals by heart. The most common protocol is:
- One Blast = STOP: Immediately cease all activity and await further instruction. This is the most important signal.
- Two Blasts = OK / PROCEED: Confirms that it is safe to continue, or that a message has been received and understood.
- Three Blasts = ROPE FREE: Signals to the person at the top of the rappel that the person at the bottom is off the rope and it is clear to be pulled or for the next person to descend.
- Continuous Blasts = EMERGENCY: An urgent call for immediate assistance.
In addition to whistles, a simple set of hand signals provides a visual backup, crucial for line-of-sight communication. A flat palm held up means “stop,” while a thumbs-up means “OK.” Before entering the canyon, a mandatory “dry run” of both whistle and hand signals ensures everyone on the team is on the same page, eliminating deadly confusion when it matters most.
The ” Hazardous Activity” Exclusion: Why Your Policy Won’t Pay for Heli-Skiing
One of the most overlooked aspects of preparing for an adventure sport like canyoning is insurance. Many standard travel or health insurance policies contain a “hazardous activity” or “extreme sports” exclusion clause. This fine print means that if you are injured while canyoning, your policy may refuse to cover medical expenses or evacuation costs, which can be astronomically high for a remote rescue.
It is a critical mistake to assume you are covered. Activities like bungee jumping, mountaineering, and often canyoning, fall squarely into these exclusion categories for most generic plans. An accident could leave you with a life-altering medical bill. Therefore, securing specialized adventure sports insurance is not optional; it is a mandatory part of responsible trip planning. These policies are specifically designed to cover the inherent risks of your chosen activity.
Fortunately, several companies specialize in this area. For example, some providers are well-known for their comprehensive coverage of adventure sports. According to travel insurance analysis, certain policies are designed to cover over 250 adventure activities including canyoning across all their plans. When purchasing a policy, you must explicitly verify that “canyoning” or “canyoneering” is listed as a covered activity. Never assume. Reading the policy documents carefully is as important as checking your harness.
Water Filters vs Tablets: How to Drink Safely from Streams ?
While canyons are filled with water, not all of it is safe to drink. Streams can be contaminated with bacteria, protozoa, or viruses from upstream sources, and drinking directly from them is a recipe for gastrointestinal illness. Dehydration is a serious risk in canyoning, as it impairs judgment and physical performance, so carrying a reliable water treatment method is essential for safety and self-sufficiency.
There are several effective methods for treating water, each with pros and cons specific to the canyoning environment. Filters provide immediate clean water but can be bulky and are prone to clogging with the fine sediment often found in canyon streams. Tablets (iodine or chlorine dioxide) are lightweight and reliable but require a wait time of at least 30 minutes, which can be inconvenient. UV sterilizers are fast but depend on batteries, which can fail in a wet environment.
For most canyoneers, a combination of methods or relying on the guide’s pre-treated supply is the best approach. The following table provides a quick comparison to help you understand the trade-offs.
| Method | Pros for Canyoning | Cons for Canyoning | Time Required |
|---|---|---|---|
| Filters | Immediate clean water | Can clog with sediment | Instant |
| Tablets | Lightweight, reliable | 30-minute wait time | 30 minutes |
| UV Sterilizers | Fast treatment | Requires batteries | 60 seconds |
| Guide’s Supply | Pre-treated, ready | Limited quantity | N/A |
Key takeaways
- Understand Physics Over Fear: Escaping water hazards like hydraulics is a matter of following a technical procedure (tuck and float), not fighting the current.
- Your Gear is Your Lifeline: A thick canyoning wetsuit provides significant buoyancy, and specialized insurance is mandatory, not optional.
- Communication is Clarity: The roar of a waterfall makes verbal commands impossible. Master the unambiguous language of whistle and hand signals.
- Move with Intention: Identify and avoid slippery black moss on rocks, and always maintain three points of contact when traversing.
How to Train for Alpine Peaks While Living at Sea Level ?
While this article has focused on the technical skills to manage water hazards, building a baseline of water competency is the final piece of the confidence puzzle. You don’t need to become a competitive swimmer, but you do need to be comfortable in the water while wearing your gear. This can be effectively trained in a controlled environment like a local swimming pool, long before you ever set foot in a canyon.
The goal of this training is not speed or endurance, but familiarity and efficiency of movement. Practice floating on your back, first without and then with a small backpack to simulate the weight and bulk of your gear. Tread water, focusing on slow, energy-efficient movements rather than frantic splashing. A key drill is practicing the “defensive float” position: floating on your back with your feet up and pointed downstream, ready to fend off obstacles. All these drills should eventually be performed while wearing a PFD to get used to the change in your body’s buoyancy and balance.
This preparation makes a world of difference. As one company, Intrepidus Outdoors, has shown, it’s about preparation, not prior ability; they have guided everyone from “navy divers and non-swimmers” down canyons, even successfully guiding a blind person through a technical canyon. The following pool protocol is a great starting point:
- Bobbing Practice: Perform 10 sets of controlled breathing while bobbing in deep water to get comfortable with submersion.
- Back Float with Pack: Practice floating on your back with a small weighted backpack for 5 continuous minutes to simulate canyon gear.
- Treading Water: Build up to 10 minutes of continuous treading, focusing on efficient leg and arm movements.
- Defensive Position: Practice the feet-first defensive float position for 2-minute intervals.
- PFD Familiarity: Complete all drills while wearing a PFD to understand its impact on your buoyancy and movement.
With this foundational training and technical knowledge, you are no longer a “non-swimmer” in a dangerous place. You are a prepared canyoneer equipped with the specific skills to navigate the aquatic environment safely. Your next step is to find a certified, reputable guide and discuss your experience and concerns, ready to put your new knowledge into practice.