Contrary to popular belief, your new windows are likely performing perfectly; they’ve just exposed the much larger, pre-existing energy leaks in the rest of your home’s thermal system.
- The primary culprits are often hidden thermal bridges, an unbalanced building envelope, and an incorrect upgrade sequence.
- Making a house too airtight without managing ventilation can create new problems, like condensation and mold.
Recommendation: Shift your focus from the windows to diagnosing and sealing the entire building envelope, starting with the attic, to achieve real energy savings.
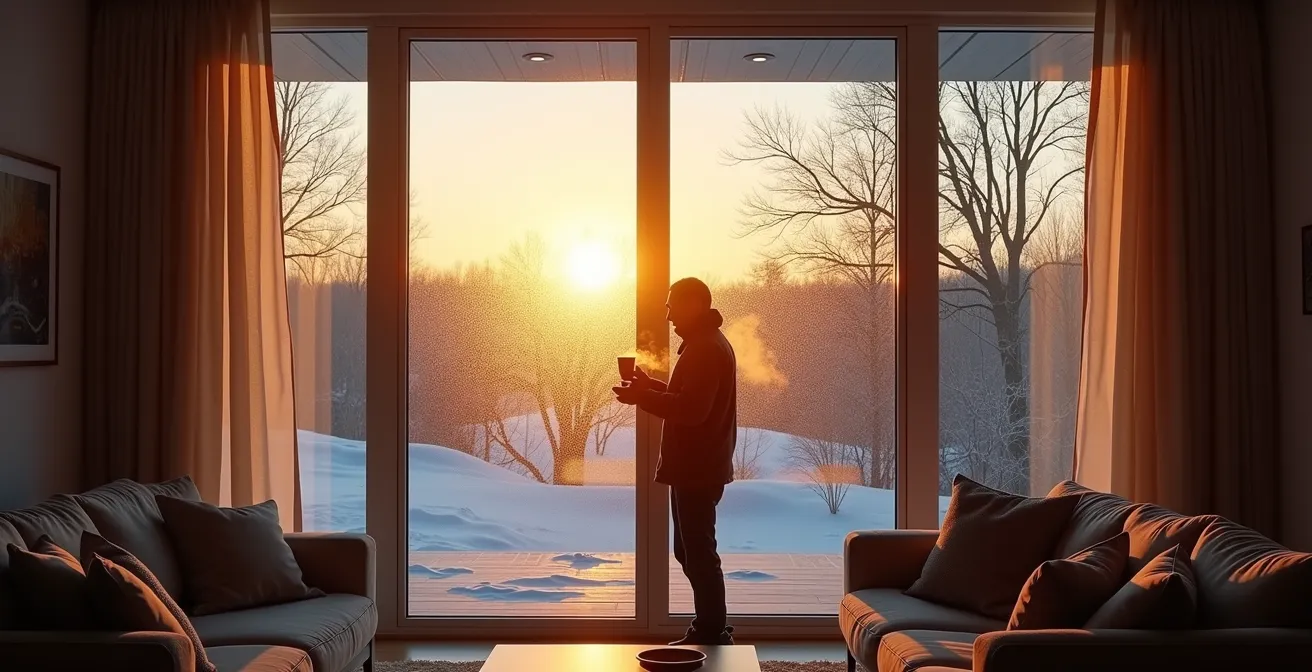
You did everything right. After months of research, you invested a significant amount of money in new, high-performance windows. The promise was clear: lower heating bills, a more comfortable home, and a smart return on investment. Yet, as the seasons change, you stare at your energy bill in disbelief. The numbers haven’t budged, or worse, they’ve gone up. This frustrating experience is incredibly common among homeowners who’ve made what they thought was the single most impactful energy-efficient upgrade.
The conventional wisdom is to blame faulty installation or to question whether you should have opted for even more expensive triple-glazing. While these factors can play a role, they often miss the fundamental issue. The problem isn’t the windows themselves. The problem is that a house is not a collection of independent parts; it’s a complete, interconnected thermal system. Upgrading just one component—even a major one like windows—can have unintended consequences by revealing and even exacerbating the hidden weaknesses in the rest of your home’s building envelope.
But if the windows aren’t the primary leak, what is? The truth is that your new, airtight windows have stopped a major source of energy loss, and in doing so, have changed the pressure dynamics within your home. This change forces air to find new, less obvious escape routes. This article will provide a diagnostic framework, moving beyond the windows to analyze the entire system. We will explore how to detect these hidden leaks, understand the risks of an overly sealed home, compare glazing options realistically, and, most importantly, establish the correct sequence for any energy-efficiency project to ensure your investment finally pays off.
This guide breaks down the complex thermal dynamics of a home into clear, actionable steps. By understanding how your house truly functions as a system, you can move from frustration to an effective, long-term solution for energy efficiency.
Summary: Why Your New Windows Aren’t Lowering Your Heating Bill ?
- How to Detect Thermal Bridges in Your Home Without Expensive Equipment ?
- The Mold Risk That Comes With Sealing Your House Too Tightly
- Double Glazing vs Triple Glazing: Is the Extra Cost Worth It in Mild Climates ?
- Synthetic Foam or Mineral Wool: Which Is Safer for Fire Resistance ?
- Sequencing Your Insulation Work: Roof, Walls, or Windows First ?
- Why Kitchen Renovations Don’t Always Add Value to Your Home Appraisal ?
- When is the Best Time of Year to Paint Exteriors with Natural Lime ?
- How to Design a Smart Kitchen Triangle That Actually Saves You Time ?
How to Detect Thermal Bridges in Your Home Without Expensive Equipment ?
Before you blame the windows, you must first become a detective. The real culprits are often invisible “thermal bridges”—pathways of high thermal conductivity that allow heat to bypass your insulation. These are the secret highways for heat loss. Think of them as holes in your home’s “thermal armor.” They commonly occur where materials meet: where walls connect to the foundation, around window and door frames, and where structural elements like beams penetrate the insulated envelope. Your new, efficient windows have sealed one major leak, causing heat to flow more aggressively toward these other weak points.
You don’t need a thermal imaging camera to start your investigation. Simple, low-tech methods can be surprisingly effective at revealing these problem areas. The key is to test during periods of high-temperature difference between inside and outside, such as on a cold morning before the sun has warmed the walls. By systematically checking corners, junctions, and material intersections, you can create a mental map of your home’s thermal weaknesses. This hands-on diagnosis is the first step in understanding where your energy is truly escaping.
Your Action Plan: DIY Thermal Bridge Detection
- Conduct the ‘Back-of-Hand Test’: In the pre-dawn hours, when the temperature difference peaks, slowly scan your interior walls, corners, and window frames with the back of your hand. It’s more sensitive to temperature changes than your palm. Feel for distinct cold spots, which indicate a thermal bridge.
- Visualize Air Leaks: Light an incense stick or a smoke pencil and hold it near window frames, electrical outlets, and where the floor meets the wall. If the smoke is drawn in or blows away in a steady stream, you have an air leak. If it swirls in a circular pattern, it indicates a convective loop caused by a cold surface—a classic sign of a thermal bridge.
- Document Condensation Patterns: On a cold morning, take photos of where condensation forms on your windows and walls. These moisture patterns create a natural thermal map, highlighting the coldest surfaces and pinpointing insulation failures.
- Inspect Material Junctions: Pay close attention to the points where different building materials meet, such as the wood of the window frame against the drywall or the concrete foundation meeting the wooden wall sill. These interfaces are prime locations for thermal bridging.
- Repeat Seasonally: Perform these checks in both winter and summer. Thermal bridges become more pronounced during extreme temperature differences, and seasonal testing will give you a complete picture of your home’s performance.
The Mold Risk That Comes With Sealing Your House Too Tightly
Here lies a great paradox of energy efficiency: in our quest to seal every crack, we can inadvertently create a new and more dangerous problem. Older, drafty houses, for all their faults, had one thing going for them: they “breathed.” Air leaks provided constant, albeit uncontrolled, ventilation. When you install high-performance windows, you effectively cork the bottle. You stop the drafts, but you also trap moisture. Every-day activities like cooking, showering, and even breathing release gallons of water vapor into the air. Without a path to escape, this moisture-laden air finds the coldest surfaces in your home—which, ironically, are often the thermal bridges you just identified.
This is where condensation and mold become serious risks. As the case study snippet notes, mold and condensation are frequently caused by thermal bridges around windows. When warm, humid indoor air touches a cold surface (like a metal window frame or a poorly insulated wall corner), its temperature drops below the dew point, and the moisture condenses into water droplets. This provides the perfect breeding ground for mold, which can damage your home and pose health risks. Your new windows aren’t causing the moisture; they are simply trapping it, revealing the need for a balanced ventilation strategy.

The condensation patterns seen here are a critical warning sign. They indicate that the home’s ability to manage moisture is out of sync with its new level of airtightness. Modern building science emphasizes using a system of breathable materials that work with sealed windows to manage moisture. The solution isn’t to re-introduce drafts, but to implement controlled ventilation, such as heat recovery ventilators (HRVs) or exhaust fans, to manage indoor humidity while preserving the heat you’ve worked so hard to keep inside.
Double Glazing vs Triple Glazing: Is the Extra Cost Worth It in Mild Climates ?
A common reaction to disappointing energy savings is to wonder, “Should I have bought triple-pane windows?” While triple-glazing is a remarkable technology, its effectiveness is highly dependent on your climate and the overall state of your home’s insulation. For many homeowners, it represents a point of diminishing returns. Windows are a known weak point in any home’s thermal envelope; in fact, according to the Department of Energy, windows can account for 25-30% of residential heating and cooling energy loss. However, upgrading from a decent double-pane Low-E window to a triple-pane unit yields progressively smaller gains, especially in moderate climates.
The decision requires a cost-benefit analysis. A triple-pane window’s primary advantage is its lower U-factor, which measures the rate of heat transfer. While numerically superior, this advantage only translates into significant savings in regions with extremely cold, long winters. In milder climates, the additional upfront cost, increased weight (which can strain framing), and marginal performance gain often result in a return on investment (ROI) that can stretch for decades, far longer than the window’s lifespan.
The following table provides a clear comparison. Before over-investing in windows, it’s crucial to assess if that money could be better spent on more impactful upgrades, like attic insulation, which often provides a much faster and more substantial ROI. A realistic perspective is that even the best windows have their limits; ENERGY STAR certified windows can reduce energy bills by an average of 13%, a significant but not total solution.
| Feature | Double-Pane Low-E | Triple-Pane Low-E with Argon |
|---|---|---|
| U-Factor Range | 0.28-0.35 | 0.18-0.25 |
| Typical Cost Premium | Baseline | 25-50% higher |
| Weight Impact | Standard | Significantly heavier |
| ROI in Mild Climate | 10-15 years | 25-40 years |
| Best Application | Most residential uses | Extreme climates only |
Synthetic Foam or Mineral Wool: Which Is Safer for Fire Resistance ?
Once you start looking beyond the windows to the surrounding building envelope, the choice of insulation material becomes critical—not just for thermal performance, but for safety. The small gaps around a window frame are major points of energy loss, and insulating them is essential. The two most common choices for this task are synthetic spray foams (like polyurethane) and mineral wool. While both are effective insulators, their behavior in a fire is dramatically different, a factor that is often overlooked.
Synthetic spray foams are prized for their ability to expand and create a perfect air seal. They are excellent at stopping drafts. However, most are petroleum-based products. In a fire, they can melt, drip, and release thick, toxic smoke. While many are treated with fire retardants, their fundamental nature is combustible.
Mineral wool, on the other hand, is made from rock or slag that is melted and spun into fibers. It is inherently non-combustible and can withstand temperatures exceeding 1,000°C (1,800°F). It does not produce toxic smoke or contribute to the spread of flames. In the context of the building envelope’s integrity, this is a significant safety advantage. By using mineral wool around window frames and in wall cavities, you are not only insulating but also creating a fire break that can help slow the spread of a fire from one part of the house to another.
While proper window installation involving air sealing and insulation is key to reducing energy loss, the choice of material carries long-term safety implications. For areas where fire resistance is a priority, mineral wool offers a superior level of passive protection, making it a safer choice for the critical junctions within your home’s thermal system.
Sequencing Your Insulation Work: Roof, Walls, or Windows First ?
This is the most critical concept in correcting your home’s energy performance, and the one most often ignored. Homeowners often replace windows first because they are a visible and tangible upgrade. However, from a thermodynamic perspective, this is almost always the wrong order. A house loses heat primarily through two mechanisms: convection (air movement) and conduction (heat moving through solid materials). The most significant factor is the “stack effect”: warm, buoyant air rises and escapes through the highest point of your home (the attic), creating a negative pressure that pulls cold air in from the lowest points (the basement or crawlspace). Your new windows did nothing to stop this house-wide convective loop.
Therefore, the single most effective action you can take is to air seal and insulate the attic. As expert Jason Peavey of PV Heating, Cooling & Plumbing states, “If energy efficiency is your goal, air sealing your attic and optimizing insulation levels is almost always Priority One.” By sealing the “lid” of your house, you stop the stack effect at its source. Only then does it make sense to address the walls and, finally, the windows. Tackling the problem in this sequence ensures that each investment builds upon the last, creating a truly effective and holistic thermal envelope.

Thinking of your home as a complete system, as visualized here, is crucial. If you’ve already replaced your windows, all is not lost. You can still “recover” the value of your investment by immediately prioritizing attic air sealing. This will maximize the performance of your new windows and finally start delivering the energy savings you expected.
The correct sequence for a home energy retrofit is not a matter of opinion; it is based on the laws of physics:
- Priority 1: Air seal and insulate the attic first. Heat rises, and the vast majority of energy loss in a typical home occurs at the top.
- Priority 2: Seal and encapsulate the crawlspace or basement. Address the bottom of the pressure differential to stop cold air from being pulled in.
- Priority 3: Add wall insulation where accessible. This fills in the thermal envelope between the sealed top and bottom.
- Priority 4: Only then, consider window replacement. This final step should be taken if your existing windows are single-pane, damaged, or at the end of their functional life.
Why Kitchen Renovations Don’t Always Add Value to Your Home Appraisal ?
At first glance, a kitchen renovation seems entirely unrelated to window efficiency. But there is a powerful metaphor here that perfectly illustrates the homeowner’s dilemma: the fallacy of the single-point upgrade. Real estate agents often say kitchens and bathrooms sell homes, leading homeowners to invest heavily in these areas expecting a dollar-for-dollar return on their appraisal value. However, appraisers look at the entire property. A brand-new, high-end kitchen in a house with a failing roof and an ancient furnace won’t deliver the expected value, because the home’s core systems are compromised.
This is precisely the same principle at play with your new windows. You’ve installed a “gourmet kitchen” of windows in a house with a “leaky roof” of an attic and “cracked foundation” of an unsealed basement. Your windows are an aesthetic and functional improvement, but their ability to deliver financial returns (in the form of energy savings) is being undermined by the poor performance of the surrounding building envelope.
Just as a home appraiser assesses the whole property, you must assess your home as a whole thermal system. Focusing all your budget on one highly visible element while ignoring foundational issues is a recipe for a poor return on investment. The money spent on those new windows is not wasted, but its potential is currently locked. To unlock it, you must now address the less glamorous but more impactful systemic issues, like air sealing and insulation, that provide the foundational “value” for your entire home’s energy performance.
When is the Best Time of Year to Paint Exteriors with Natural Lime ?
Let’s extend our systemic thinking to the very “skin” of your home—its exterior cladding and coatings. The question of when to apply a specific coating like natural lime paint brings up the critical concept of breathability. Traditional lime wash is a highly vapor-permeable material, meaning it allows moisture trapped within the wall structure to escape. Modern acrylic and latex paints, by contrast, can form an impermeable plastic-like film, trapping moisture inside the walls.
This connects directly to the problem of a house that has been sealed too tightly. If your new windows have stopped air from moving through the house and your exterior paint is non-breathable, you have created a double-sealed trap. Moisture that gets into the wall assembly (from either inside or outside) has no way to dry out, leading to rot, insulation degradation, and structural damage over time.
The choice of exterior paint is not just an aesthetic one; it is a key component of your home’s moisture management system. The synergy between properly sealed windows and a breathable wall system is essential. Choosing a breathable coating and applying it under the right conditions (typically in mild, dry weather to ensure proper curing) is part of a holistic strategy. It ensures that your home’s “skin” can perform its job of shedding bulk water while still allowing the wall assembly to breathe and dry, working in concert with your high-performance windows, not against them.
Key Takeaways
- Your new windows are not the problem; they are a diagnostic tool revealing pre-existing flaws in your home’s thermal system.
- A house functions as a complete building envelope. Sealing one part (windows) without addressing others (attic, foundation) leads to disappointing results.
- The correct upgrade sequence is non-negotiable for ROI: 1. Attic air sealing, 2. Basement/crawlspace sealing, 3. Walls, and 4. Windows.
How to Design a Smart Kitchen Triangle That Actually Saves You Time ?
The classic “kitchen work triangle” is a design principle that optimizes the layout between the stove, sink, and refrigerator to save steps and time. We can borrow this powerful concept to design a new “Efficiency Triangle” for your home, shifting the focus from isolated components to a strategic relationship between the three most critical areas of the building envelope: the Attic (Top), the Foundation (Bottom), and the Walls/Windows (Middle).
As The Emory Wheel noted in an energy analysis, “Windows make sense as part of a comprehensive energy upgrade, alongside insulation, air sealing, and HVAC improvements.” Designing your efficiency strategy around this new triangle is the key to finally seeing the savings you were promised. Your focus must shift from simply “buying better windows” to orchestrating the performance of these three zones. It means stopping the stack effect by sealing the top and bottom of the triangle before perfecting the middle. This systemic approach is what separates homeowners who see real savings from those who remain frustrated.
By applying this strategic framework, you transform from a consumer of products into the designer of your own home’s efficiency. You can finally achieve a comfortable, healthy, and cost-effective living environment, where every component, from the attic insulation to your new windows, works in harmony. This is how you unlock the potential of your investment and achieve the savings you’ve been searching for; the Department of Energy reports that homeowners who undertake comprehensive upgrades can save between $126 and $465 annually.
Now that you have a diagnostic framework, the next logical step is to perform a systematic energy audit of your own home, starting with the simple detection methods and prioritizing the upgrade sequence we’ve outlined.